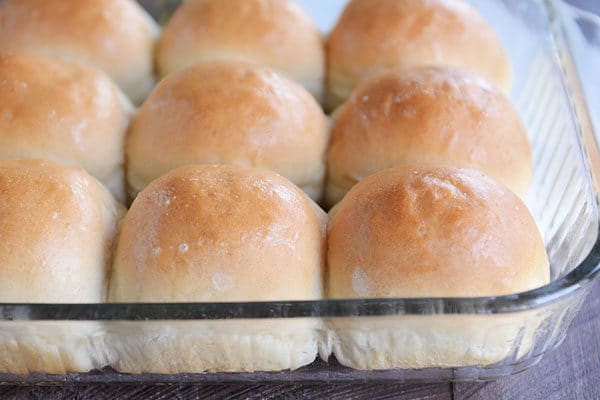
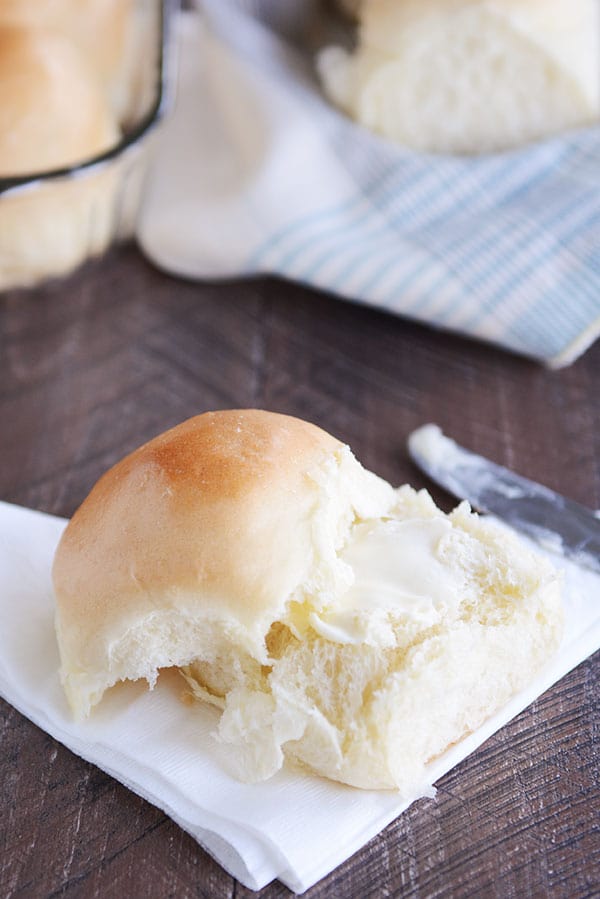
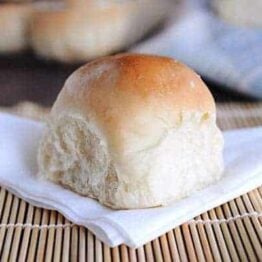
French Bread Rolls {Step-by-Step}
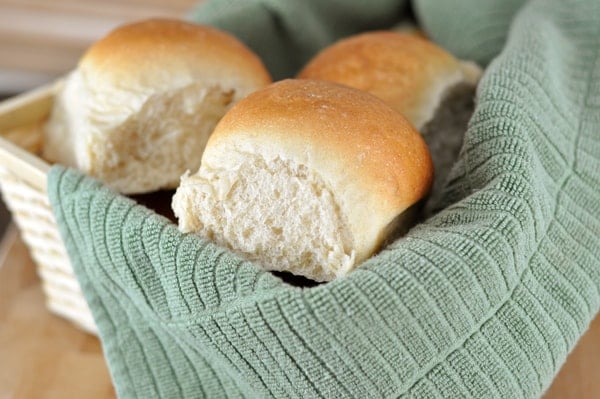
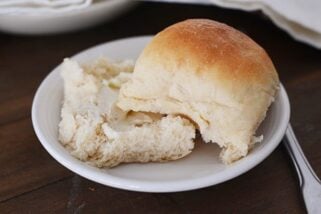
These French bread rolls make the best dinner rolls, hamburger buns, or sub buns. They are light, fluffy, and perfect for beginner (or expert) bakers. With over 1,000 5-star reviews, they are one of the most popular roll recipes on the internet.
⭐️⭐️⭐️⭐️⭐️ Thank you so much for the recipe. The rolls were wonderful. Made a double batch for Easter and froze some. They freeze excellently. Will be my go to rolls. -Jackie

Why So Many People Love This Recipe
The dough for these French bread rolls is straightforward and very forgiving. Here are many reasons why this is a foolproof, trusted recipe:
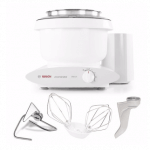
- A stand mixer fitted with the dough hook makes easy work of this recipe, however, the dough is so easy to make that it can also be mixed and kneaded by hand.
- The recipe doesn’t require scalding milk or any fussy steps. The ingredients are basic and dairy-free (other than brushing the tops of the baked rolls with butter).
- The rolls are ultra-soft and fluffy.
- You can shape the dough into dinner rolls, sub buns, hamburger buns – and some reviewers even report using the dough for pizza crust.
- These French bread rolls are easy enough for simple dinners and delicious enough to serve at any holiday dinner.
Ingredients Notes
- Warm water: The temperature of the water should be between 105 and 110 degrees F.
- Yeast: Both instant yeast and active dry yeast work in this recipe.
- Sugar: The small amount of sugar in these rolls helps activate the yeast and assists in the rolls rising quickly. It isn’t enough sugar to make the rolls taste overly sweet. You can dial the sugar up or down depending on your taste preferences.
- Oil: A few tablespoons of oil gives the dough a supple, smooth texture and helps the rolls taste fresh even the day after baking.
- Salt: I use table salt for this recipe.
- Flour: All-purpose or bread flour can be used – or a combination of both. Bread flour will create a chewier, fluffier roll texture. You can sub in 50% whole wheat flour for part of the white flour; if doing so, I recommend using a white whole wheat variety, which helps the dough stay light and fluffy.

Tips for Making Yeast Dough at Home
Here is the biggest tip I can give for successfully making yeast dough at home:
Stop stressing about adding the exact amount of flour called for in a recipe. Many, many factors determine how much flour is needed (elevation, humidity, how we each measure flour, etc.) Add the flour gradually and judge the dough by how it looks and feels. If you need to add a bit more flour, that’s ok!
How to test this French bread roll dough:
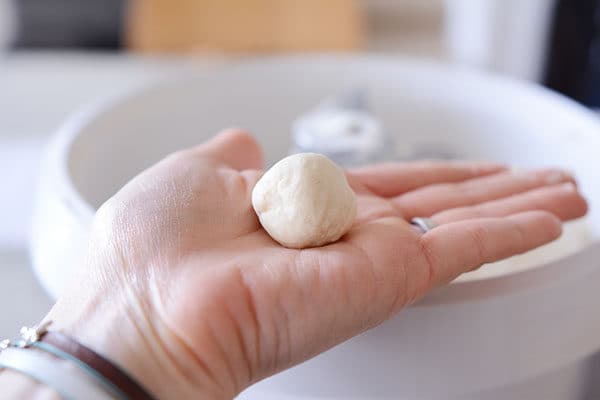
- After the flour has been added and has kneaded for a few minutes, grab a golf ball-size piece of dough.
- Initially, it might leave a little sticky residue on your fingers.
- Try rolling it into a ball without any oil or cooking spray on your hands.
- If it can form a ball shape without sticking to your hands in a shaggy, horror-movie mess, you are good to go. If not, add a bit more flour (a couple tablespoons), mix and try again.
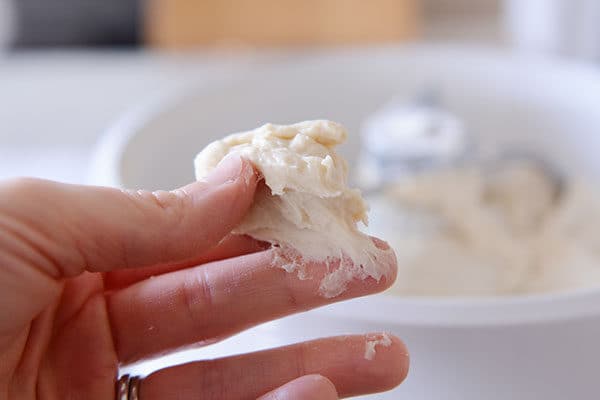
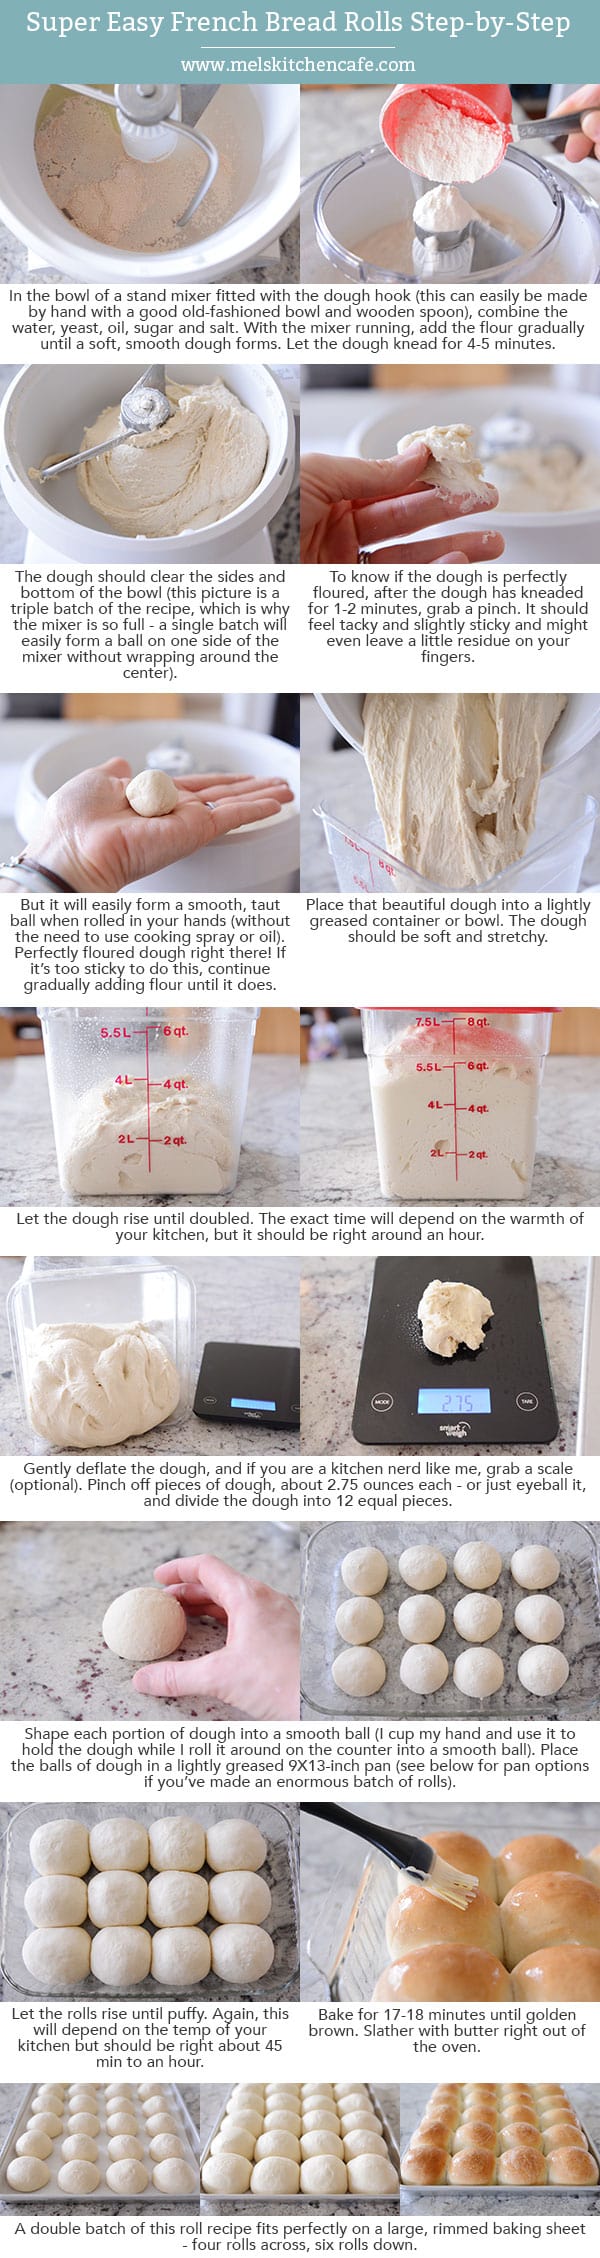
You can see from the pictures below that initially, the dough seems pretty sticky, however, it rolls just fine into a ball without a lot of sticky dough on the palm of my hand. Adding too much flour can lead to rolls that are dense and heavy, so take time to learn what a properly floured dough looks and feels like.
How to Shape French Bread Dinner Rolls
- Cut the dough into 12 equal pieces.
- I like to weigh each piece to make sure they are uniform. Each dough piece usually weighs right around 2.6 to 2.7 ounces.
- Cup your hand around the dough and roll the dough into a smooth ball, keeping the pinky side of your hand against the counter while you roll.
- Pinch the bottom to seal, if needed.
A single batch of roll dough (12 rolls) fits in a 9X13-inch pan. I almost always double this recipe and bake the rolls on a half sheet pan, which fits 24 rolls perfectly.


The Perfect Roll for Sandwiches or Subs
Over the years, these French bread rolls have become more than a dinner roll.
A quick scroll through the comments shows that many of you are using this roll dough for everything from sloppy joes to sub sandwiches.
Make-Ahead and Freezer Notes
Make-Ahead: The dough for these French bread rolls can be made and refrigerated overnight (either in bulk, or the rolls can be shaped, place on a pan, covered and refrigerated). Take the shaped rolls out of the fridge to rise fully before baking.
Freezing: The baked and cooled rolls freeze great. Place the rolls in a ziploc freezer bag, seal the bag, and place in the freezer for up to a month or so.
There is truly not an easier, more perfect roll recipe out there!
I often make these rolls for my holiday dinners – from Thanksgiving to Easter – because they are so easy, they work out every time, and they are always devoured. Plus, they make excellent leftovers!
Tools for Making French Bread Rolls at Home
*Affiliate links included below for products I’ve purchased from Amazon; feel free to shop around for the best price!*
- This is the kitchen scale I use to weigh each piece of dough.
- These containers are great for rising dough (the measurement marks make it easy to keep track of how much the dough has risen).
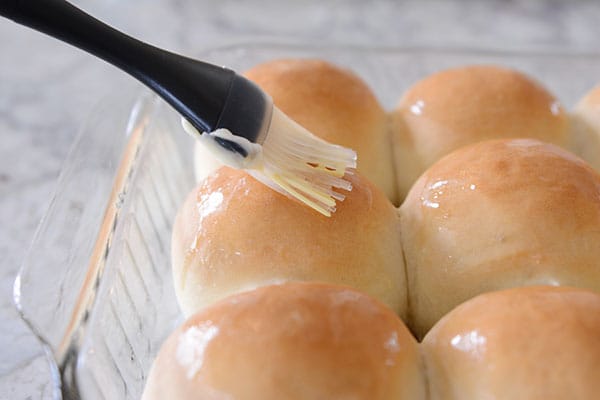
- Silicone pastry brush for brushing the rolls with butter after baking.
- My go-to OXO bench knife for portioning out the dough.
A quick note about mixers: I use a Bosch Universal stand mixer for all my bread making. Here is an older but helpful side-by-side (unsponsored) review I did between a Bosch stand mixer and a KitchenAid stand mixer.
French Bread Rolls
Ingredients
- 1 ½ cups warm water (105 to 110 degrees F)
- 1 tablespoon instant or active dry yeast (see note)
- 2 tablespoons granulated sugar or honey
- 2 tablespoons canola oil, vegetable oil, or olive oil
- 1 teaspoon table salt
- 3 ½ to 4 cups (497 to 569 g) all-purpose or bread flour, more or less (see note)
Instructions
- In the bowl of a stand mixer fitted with the dough hook or in a large bowl by hand, combine the warm water, instant yeast, sugar, oil, salt and 2 cups of the flour.
- Begin mixing, and continue to add remaining flour gradually until the dough has pulled away from the sides of the bowl.
- Knead the dough for 4 to 5 minutes in a stand mixer (7 to 9 minutes by hand). Add additionally flour a tablespoon or two at a time only if the dough starts to cling to the sides of the bowl and is really sticky to the touch (see note below for clarification).
- Place the dough in a lightly greased bowl and cover. Let the dough rise until doubled, 1 to 2 hours.
- Turn the dough out onto a lightly greased countertop.
- Divide the dough into 12 equal pieces (about 2.75 ounces each, more or less), and form the dough into round balls by cupping your hand around the dough and spinning into a round shape, pinching the bottom to seal any rough edges, if needed (video tutorial here right at minute marker 2:20).
- Place the rolls in a lightly greased 9X13-inch pan or on a lightly greased half sheet pan. Space the rolls about 1/2 to 1-inch apart.
- Cover the rolls loosely with a lightweight towel or greased plastic wrap and let the rolls rise until very puffy and nearly doubled, about 45 minutes to 1 hour.
- While the rolls rise, preheat the oven to 400 degrees F (if your oven bakes hot, preheat to 375 degrees F.) Bake for 17 to 20 minutes until golden and baked through.
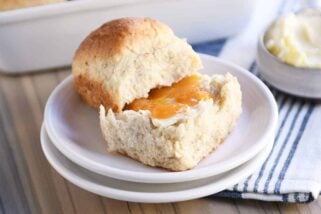
- Immediately out of the oven, brush with butter, if desired. Serve warm or at room temperature.
Notes
Recommended Products
Recipe Source: Mel’s Kitchen Cafe
Recipe originally published 12/2007; updated with new pictures, step-by-step tutorial, and recipe notes.

Thank you for a great recipe. These were really good even though I wasn’t paying attention and didn’t let them rise for an hour before shaping. So I just let them rise for 2 hours on the baking sheet. A definite repeat for me.
I do have a scale, and I will try that. I have also looked at your tutorials, which are very helpful. I like your description of the feel – that makes sense to me. I’ll keep at it – you make a good point. If it turns out ok, I must be doing something right. 🙂
Mel- I’ve made this recipe several times, and they are always great. I have a couple of questions, as I’ve learned so much about bread baking from you. I would love to say all our bread is homemade like you do! I’m trying to master one thing at a time. Anyway, I’ve tried to figure out just the right amount of dough to use for hamburger buns, and they are always too small or too big. If you have it down pat, could you share? And this is more of a general dough question: I regularly need (or think I need) more flour than called for in most recipes. I live in the humid South, so this is probably not surprising. But I always feel like I’m doing something wrong. Would you say it is pretty much a rule of thumb that when I’m mixing the dough in my KitchenAid, I am looking for the dough to pull away from the sides? And if so, how quickly should I expect this to happen? Perhaps I’m not being patient enough. Thanks
Hi Lillie – do you have a kitchen scale? When I make homemade hamburger buns, I use about 3 to 3 1/2 ounces of dough per hamburger bun. Have you seen these two posts I’ve done on the how-to’s of yeast and bread? Tutorial on Yeast and Whole Wheat Bread Step-by-Step. The pictures may help a bit. I’ve never used a Kitchenaid so it’s hard to say when the dough will pull away from the sides. I assume it’s pretty similar to my dough in a Bosch mixer. I usually judge by feel, though, more than looks. I like to pull a piece off (stop the mixer first!) and roll it in my hands to see how well it is holding it’s shape. Being in a humid climate, it’s not surprising that you have to add more flour but take care not to overflour. As long as your bread/rolls are rising fine and tender and light, it sounds like you are on the right track.
Tried this today for our Christmas dinner and they were wonderful! They looked great. I worry about trying a recipe for the first time at Thanksgiving or Christmas but this one was a big success and I’ll be baking a lot of these.
Tried these rolls tonight, and they were great. I actually liked that the bottoms of my rolls were a little crisp, but if you don’t like that I guess lower the temp. I was expecting soft, light airy rolls (not sure WHY I thought French bread rolls would be light) but they definitely have a French bread texture. Delicious and easy!
Yum…yum…yummmmm!!!
I don’t have a breadmaker and kneaded this by hand and tried (unsuccessfully) to roll them into “sub” shapes (I need to work on my shapes…my kids were pretending they were animals at the dinner table)….but they were AWESOME!
I am attempting to make these today, wish me luck, I have never baked anything before lol 😉
This had become my go to for a quick pizza crust, stromboli, etc. It’s easy to whip up. I always have the ingred. and it always turns out great! I just made pizza pockets for my kids lunches. Hoping it will be a nice change from sandwiches.
Diane K, I usually space them out about an inch but by the time they’ve risen, they are touching. I usually take care not to let the plastic wrap get trapped underneath the baking sheet because if the rolls don’t have room to rise up they can flatten, so I just lay the plastic wrap lightly over the top of the rolls. Placing them closer together could definitely help them keep their shape.
Hey, I just looked at your beautiful picture and wondered how close you usually put your rolls together? I made them for the first time as rolls (well, they were sub rolls) and they were delicious but more wide than tall. I feel like the plastic wrap was holding them down. Do you think putting them closer together helps them from spreading too much out and helping them go up?
Because oh man were they delicious. I seriously couldn’t stop eating them.
Holy Moly. I just made these rolls to go with our sloppy joes…. and The kids are hoovering over them eating them all… they are yummy.
Thanks for the fab recipe and I am so happy I happened upon your blog.
I was lazy one day and decided to use this as a pizza dough rather than my usual one that takes longer. It was delicious!!!
these look so light and fluffy mouthwatering rolls in which I would only need probably nothing on to eat and enjoy.
I have been searching and searching for a roll/bun recipe that is both soft and strong enough to stand up to a beef patty….thank you for this one!
Making this again…the 400th time. I love this recipe!!!!
Hi Maria – so glad you are enjoying the recipes! As for the whole wheat flour, I always sub in white whole wheat flour and usually just add 2-3 cups to start and then finish with all-purpose flour. The only other change I make is to knead for about 3-4 minutes longer if I’ve used whole wheat flour.
My family loved this! I read in one of your comments that you usually sub some whole wheat flour. Could you tell us how much, and if any of the other steps change, or if you add anything like vital wheat gluten? PS, my kids now ask when I make a new recipe if if comes from Mel’s Kitchen Cafe! PSS, my 13 year old daughter made your “best” cinnamon rolls and they were amazing! Thanks for your help.
I just made these for hotdog buns, I used this pan.. USA Pans New England Hot Dog Pan
Worked great, after the first raise I spread the dough into the pan and let it raise until it was a half inch below the lip. I baked at 400 for probably 17 min with a cookie sheet over the top of the pan weighed down with a glass bread pan (empty). Thanks for the great recipe!
Thank you for this recipe! They were so easy to make and paired great with your Italian Meatball Sub. 🙂 Your recipes are ALWAYS a hit in my home. 🙂
I just wanted to say these rolls are great! My husband came home for lunch today and they came out of the oven so he took one and called to say that the rolls were so good! I have tried the recipe many times, and actually, messed up a lot. Once I forgot the salt, once my daughter stopped the timer, so they were a little too done, but not bad, and another time, I took another reader’s advice and added a little more salt, but I didn’t like that. Anyway, finally, I got it right and they worked and I am so glad! So, if they don’t work out the first time, or the second, try, try again!
I made these rolls yesterday with pulled chicken bbq sandwiches and the rolls were amazing and good enough to eat plain but when I put it with the bbq the flavors did not go well together 🙁 so I made KAF recipe for egg buns and those went perfectly and I used these buns to make amazing breakfast sandwiches. All and all I would use these for a meatball sub, deli sub or egg sandwiches but not for grilling… Probably just my opinion… And I still love the rolls! Thanks for a great recipe again!
I know I’m incredibly late, but I had to tell you that I made these last night and I’m pretty sure I’m the best wife on the block according to my husband!!
They were so easy, thanks so much!!!
LAN – whenever I’ve refrigerated the dough overnight, I’ve done it after shaping it into the balls. I shape the rolls, put them on the sheet pan and refrigerate covered overnight. I take them out to rise doubled and then bake them.
Love that I found you on pinterest! I’ve made beef stroganoff, homemade pizza and cornbread and turned out wonderful. I made these rolls… mine had a harder outer shell and were soft on the inside. They were good but I don’t think quite right. So I was trying to make the night before so I made the dough and then put it in the refridgerator to slow rise overnight like the pizza dough recipe. I took out this morning and made into balls and let them rise before baking. Just wondering what I did wrong or if I can use the slow rise technique
Rachel – I don’t have any major secrets for the shape of the rolls. I roll them into balls and place them about 1 inch apart on the baking sheet so that when they rise, they use each other to keep their shape (meaning they don’t have a lot of space to flatten out so they rise tall instead of wide, if that makes sense). If your rolls are flattening instead of getting height while rising, you may need to add just a touch more flour to the dough. Good luck!
I just made these tonight with the BBQ Chicken Braid. I made one braid, then from the other half of the dough I made rolls for later this week. Can I just say they are INCREDIBLE!!! Thanks Mel!!!
I also have a question on the shape of the rolls…yours look so beautiful in the picture! How do you get them to be so deep/tall? Mine look round like yours and are very soft and yummy, but I can’t seem to get them to be as tall. Any tips???
Every member of my family loved these rolls when I made them last night,my 6 year old requested them for her birthday dinner…. it’s not her birthday for another 5 months!!
Carlie – I make and freeze these rolls all the time and they are just as delicious and tender out of the freezer (as long as they are thawed all the way). Sometimes I’ll slightly warm them in the microwave before serving, too.
Hey Mel. We love these rolls. I will be making them with your pulled pork( my husbands favorite) on Saturday for his graduation party. I was wondering if I made them tomorrow and froze them will it remove the “wow” factor they currently hold or will they still be as tasty as normal? Trying to save me some time on Sat.
These rolls really are amazing! I just made them, but being skeptical that they were really that good, I only made one batch. I think I need to make another batch today because I have a feeling that I will need more for my family of 5 (which includes 2 teenagers). I’m sure they will not be satisfied with just one roll (I made sub-sized for meatball subs tonight so there were only 6).
First, let me say that you have made me into a bread maker. My results are never as pretty as yours but oh my are they always delicious. I get so excited to try your recipes that we are now having homemade bread at least once a week. My hubby couldn’t be happier. In fact, when I was looking at your Blitz Bread recipe, he announced, “I bet I could make that!” and he did! Thanks for that, Mel! As you can perhaps tell, I am buttering you up to ask a little free advice about experimenting with these rolls. They are so yummy and easy that I’d love to make them for my daughter’s upcoming 1st birthday party. Since the theme of the party is rainbows and butterflies, I have been researching ways to make Rainbow Bread for finger sandwiches. What I’m finding out is that at some point you divide the dough for as many color layers as you want, then knead food coloring into each section. After, you roll the sections, stack them (obviously in rainbow order) and roll into a loaf shape. This leads me to my question (finally): if I were to attempt Rainbow Rolls using your recipe, when do you think I should divide and knead in colors? Also, do you suppose I could just slice the rolls, instead of shaping into balls after the first rise? I would think this would preserve the rainbow effect but I’m not sure how they would look shape-wise after the second rise. Any ideas you, or any of your readers, might have would be very appreciated! Not that I mind a little trial and error, of course. Just means more delicious rolls 🙂 Thanks!
Hi Mandy – so glad you are enjoying the bread recipes (and tell your husband I’m impressed with his bread making skills also!). I’m new to the rainbow roll concept, I have to admit. If it were me, I’d knead the food coloring into the portioned dough after it has gone through the first rise (right before shaping and letting the rolls rise on the pan). I’m not sure what you mean by slicing the rolls instead of shaping them into balls – are you wanting to make slices of bread or actual rolls for the finger sandwiches? I think the idea of stacking the colored layers and rolling into a loaf shape should work great as long as the colors are vibrant for each layer. Sounds like a fun project!
I make these for everything! Hamburgers, sloppy joes, pulled pork, shredded chicken… the list goes on. They are wonderful, taste better than store bought and cost so so much less. I use my bread maker and then shape and do the final rise as stated in the instructions. Thank you!
Hmm.. That’s how much I used. I didn’t even use 2 cups of flour either, but maybe I over floured. I do everything by hand, no mixer, so maybe I over kneaded too. Thanks for the tip! I’ll give the sloppy joes on homemade rolls another shot tomorrow.
Hi Karen – sorry the recipes aren’t turning out when you halve them. It sounds like if you have had success with the original recipes but not a halved version that it may be the yeast. There really isn’t harm in adding more yeast except for maybe a stronger yeast taste so I’d recommend with a halved recipe of the French Bread rolls to add 1/2 tablespoon instant yeast (or slightly more than that if using active dry) and see how it goes. The other factor to consider is overflouring but if you don’t think that is an issue (overflouring can seriously hinder rising) then try the extra yeast and see how it works. Good luck!
Hey Mel, this is the third time I’ve tried to half one of your bread recipes and it did not rise 🙁 I was sure to proof the yeast first. I don’t want a full dozen, there are only 2 of us.
Any suggestions? Last time it was your bread bowls, I made a double batch for a party and the were beautiful! But they didn’t rise when I halved it. What do ya think? Is it just the amount of yeast?
Beth – I’m glad you like this recipe! When I double a batch, I portion the dough into 24 equal portions and fit them all on one sheet. I think when I weigh the dough portions, they are about 2 1/2 to 2 3/4 ounces each in weight. I don’t use a convection setting because I don’t have a convection oven so I just bake in batches. It doesn’t seem to hurt the pan of rolls baked second to sit out an extra 15-20 minutes. Hope that helps!
I have been so happy with your “perfect dinner roll” recipe that I had not yet tried this one. I think I slightly prefer your recipe that calls for instant potato flakes for a stand-on-its-own dinner roll, but these French bread rolls were also fantastic. And I love the idea of making my own hamburger buns with it. There have been so many times that a trip to the grocery store just to get buns for burgers ends up costing me a lot more . . .
Anyway, my question is about doubling/tripling this recipe. I can fit 2 dozen of the perfect dinner rolls on my large rimmed baking sheet, but these rolls seemed bigger (or expanded more), and I don’t think I could fit 24 on one sheet. How do you handle doing double and triple batches? How many can you fit on your pans, and then do you bake in batches or use a convection setting? I’m afraid to ruin recipes and so I never use my convection setting, but maybe I need to get a little more comfortable with it as it seems that my wish for double ovens is probably not going to come true. Thanks for your advice, Mel.
Alley – if I am making this dough into hoagies or sub rolls, I divide into about 8 pieces (I’ve tried 6 and the rolls are still enormous). If you have a kitchen scale, you can use that method. When I make the dinner rolls, I weigh the pieces out to be about 2 1/2 ounces each. When I make larger hoagie/sub rolls, I weight them out to be about 3 3/4 ounces each.
Hey Mel! If you are using this recipe to make hoagies or sub loaves for meatball subs or cheesesteaks do you only divide the dough into 6 pieces and shape it in oblongs? Or how would you recommend?
Luda – if you want to bake them tomorrow, I’d suggest letting them go through the first rise and then shaping them on the baking sheet. Cover them with greased plastic wrap and then refrigerate until tomorrow (don’t let them rise at room temperature). Pull them out maybe 1 1/2 to 2 hours before you want to serve them to give them time to rise and bake.
i am making your delicious French Rolls, homemade barbeque sauce and barbeque pork for Father’s Day. I had a question about the yummy rolls…(I’ve already eaten 2)!
I sprayed my plastic wrap with Canola Oil cooking spray and then put it on top of the rolls while they raised. When they came out of the oven, many had what looked like a “stain” of oil on top of the roll. I was able to make it go away by rubbing butter on top of the hot rolls. I was just wondering what you grease your plastic wrap with and if you’ve had this problem? The butter on top makes a softer roll instead of a nice crust.
I watched the video and that helped but I don’t remember it showing how you greased the plastic…
Thanks so much!
Margaret
Margaret – Good question, I’ve noticed this happens when the cooking spray leaves bubbles of spray on the plastic wrap or I’ve greased it too heavily. Usually I spray the wrap and then lightly wipe with a paper towel so there’s no visible residue of cooking spray. Hope that helps.
you could just use a linen dish towel as well and skip the plastic wrap.
Mel- Making these right now, but I want to use them tomorrow, so can I leave them in the fridge for the first rise and then follow the recipe? Or should I shape them into rolls and then put them in the fridge?
These rolls turned out great! I shaped them into 6 sub buns. They were soft and fluffy. I only needed 3 cups of flour for them to turn out perfectly. This will be my new go-to recipe for sub buns!
Hi Mel I made the French soft rolls today, I don’t know what I did wrong, they have turned out bit doughy, I used fast action yeast soaked it in honey and water to activate which it did, the dough rised well, made into balls not all rised in size. Can you advise me please what I did wrong.
Fiona x
Is there a chance they needed to be baked longer?
I made these a couple of months ago, and they came out superb! I have the shredded chicken in my crock pot in prep for lunch tomorrow, and I wanted to make them again today. I decided to double the recipe…and as I began adding ingredients, I totally flubbed up. I couldn’t find my tablespoon measurement or my teaspoon (pesky kids!), so was using a half teaspoon. It was a bit hectic here this morning, and I also misread the yeast measurement as teaspoon instead of tablespoon. Then I realized that I ran out of regular flour and only had self-rising….so it ended up being a quarter regular, a quarter self-rising, and half whole wheat. Needless to say, I did not put in enough yeast, and only put in half the oil and sugar than was called for. I figured out that I did it wrong when I had already added all of the extra flour. I decided to add what I didn’t put in properly in the beginning. I mixed the oil and sugar and added. Then I added the rest of the yeast on top of that.
I wasn’t sure what I was going to end up with….but they came out just as lovely as before. Not that I would ever make the same mistakes again (pregnant brain is a real thing, I am proof of that!)….but it’s nice to know that even when things get messed up….it still worked out!
Jen – if the yeast flavor was too much for you I’d simply try cutting down the yeast to 1/2 tablespoon of active dry yeast. That will still be plenty to help the rolls rise (it might take them a bit longer) but it may counter the yeast taste a bit. Incidentally I haven’t noticed an overly yeasty taste to these rolls so maybe it is just a matter of preference, although, I have noticed if I let my rolls rise too quickly (if my kitchen is too warm), they’ll develop a strong yeast taste. Good luck!
I made these tonight and, while they were delicious, they came out a little too “yeasty” to really match the flavor I expected in a French bread. I added the one tbsp of active dry yeast only, so what am I doing wrong? I let it rise in a room temperature area until doubled— I’m so confused!
love these rolls, they are easy, delicious and have come out perfect every time! I keep making them! This past time I’d recently made an angel food cake, and saw the extra dozen egg yolks sitting in my fridge… and used them to replace some of the liquid in the recipe. I had 1 1/2ved the recipe to make 24 med. sized rolls (a full jelly roll pan still) and they were so beautiful golden yellow!
I’ve commented on this post before to let you know I had made these rolls. I’ve made them a few times now, but I want to tell you about today. We had Christmas with my husband’s family today & our lunch was BBQ sandwiches with typical side dishes. I was the last one to be assigned a dish so buns & baked beans were my lot. My proud husband told his mom that I would make the buns. He’s so proud of my newfound skills, but I was nervous about doing this for the family & almost bought hamburger buns to have as back-up in case I failed. These were the best rolls I’ve made so far!!! Everyone was so impressed & I ended up being way too proud of myself! Seriously, these were a HUGE hit – thank you!
Great recipe! I will definitely be making these again….perfect with the pulled pork!
Mel. WOW. I am in awe of these rolls. I stumbled upon your blog on FoodBuzz today and found these rolls, and since I was making black bean burgers for dinner decided to round them out with these rolls. They are far and away the best rolls I have ever made in my whole entire life. Can I stress that again? THE BEST!!! Wow. I am still in awe. The outside was just barely hard and the inside was like biting into the softest most elegant bread I have ever tasted. The only thing I changed was using olive oil rather than canola because I’m an olive oil fanatic. Anyway, thanks for an absolutely positively amazing recipe!!! Can’t wait to try more!