French Bread Rolls {Step-by-Step}
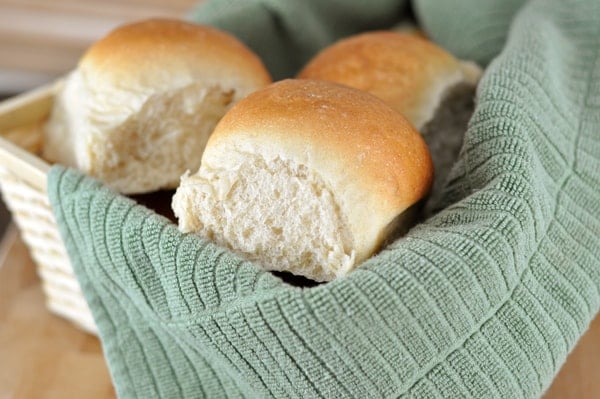
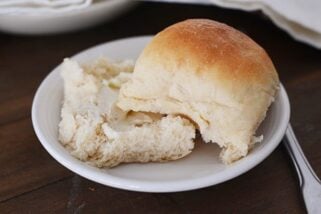
These French bread rolls make the best dinner rolls, hamburger buns, or sub buns. They are light, fluffy, and perfect for beginner (or expert) bakers. With over 1,000 5-star reviews, they are one of the most popular roll recipes on the internet.
⭐️⭐️⭐️⭐️⭐️ Thank you so much for the recipe. The rolls were wonderful. Made a double batch for Easter and froze some. They freeze excellently. Will be my go to rolls. -Jackie

Why So Many People Love This Recipe
The dough for these French bread rolls is straightforward and very forgiving. Here are many reasons why this is a foolproof, trusted recipe:
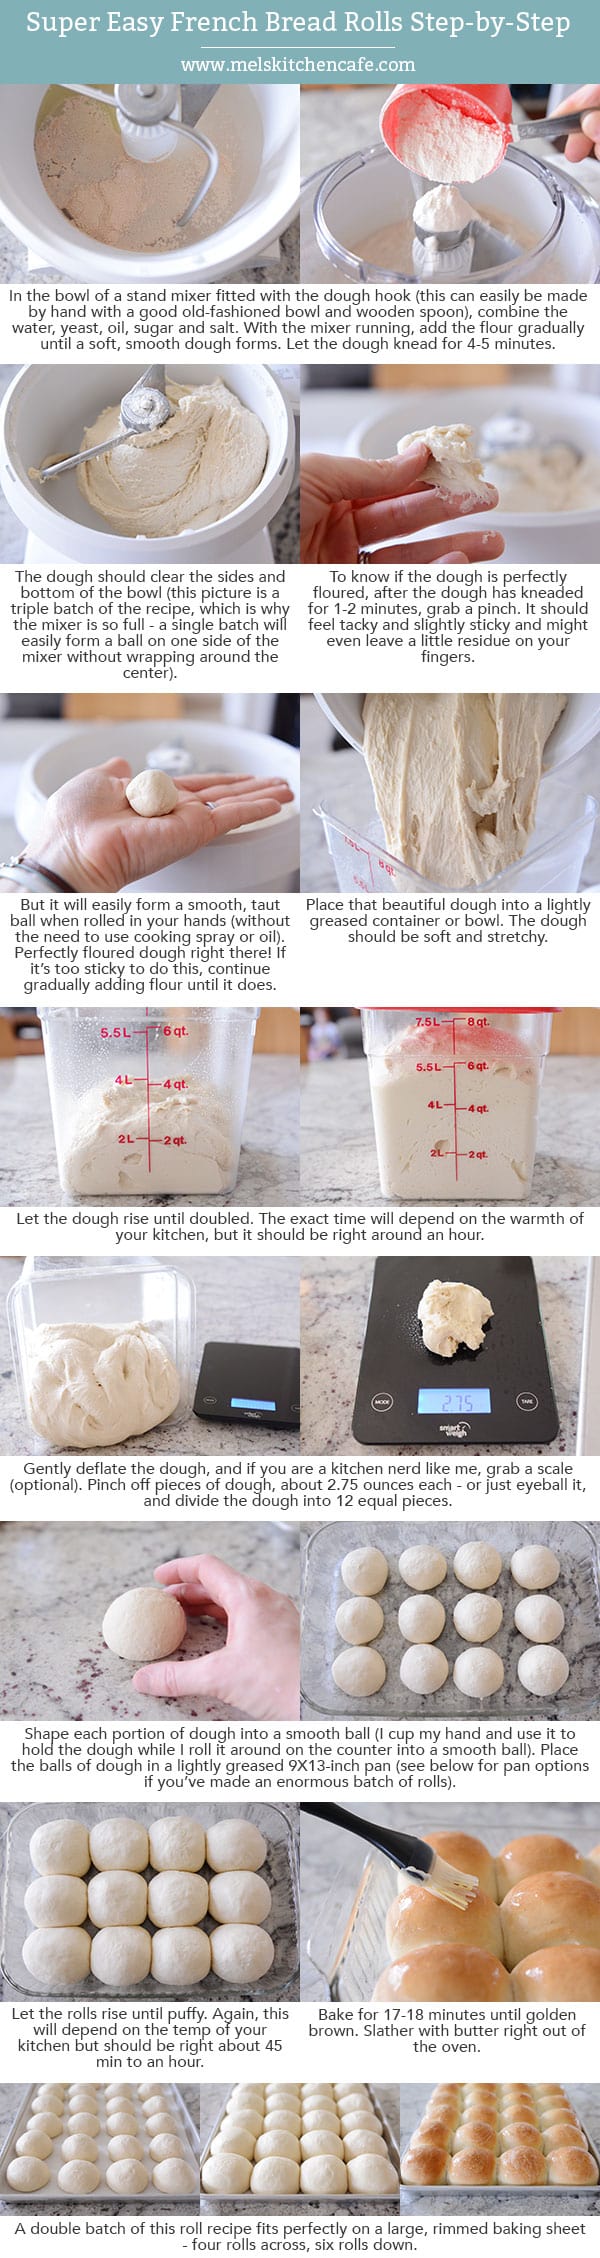
- A stand mixer fitted with the dough hook makes easy work of this recipe, however, the dough is so easy to make that it can also be mixed and kneaded by hand.
- The recipe doesn’t require scalding milk or any fussy steps. The ingredients are basic and dairy-free (other than brushing the tops of the baked rolls with butter).
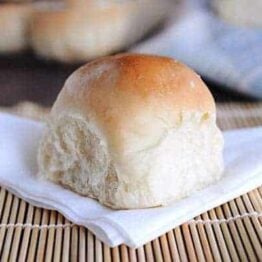
- The rolls are ultra-soft and fluffy.
- You can shape the dough into dinner rolls, sub buns, hamburger buns – and some reviewers even report using the dough for pizza crust.
- These French bread rolls are easy enough for simple dinners and delicious enough to serve at any holiday dinner.
Ingredients Notes
- Warm water: The temperature of the water should be between 105 and 110 degrees F.
- Yeast: Both instant yeast and active dry yeast work in this recipe.
- Sugar: The small amount of sugar in these rolls helps activate the yeast and assists in the rolls rising quickly. It isn’t enough sugar to make the rolls taste overly sweet. You can dial the sugar up or down depending on your taste preferences.
- Oil: A few tablespoons of oil gives the dough a supple, smooth texture and helps the rolls taste fresh even the day after baking.
- Salt: I use table salt for this recipe.
- Flour: All-purpose or bread flour can be used – or a combination of both. Bread flour will create a chewier, fluffier roll texture. You can sub in 50% whole wheat flour for part of the white flour; if doing so, I recommend using a white whole wheat variety, which helps the dough stay light and fluffy.

Tips for Making Yeast Dough at Home
Here is the biggest tip I can give for successfully making yeast dough at home:
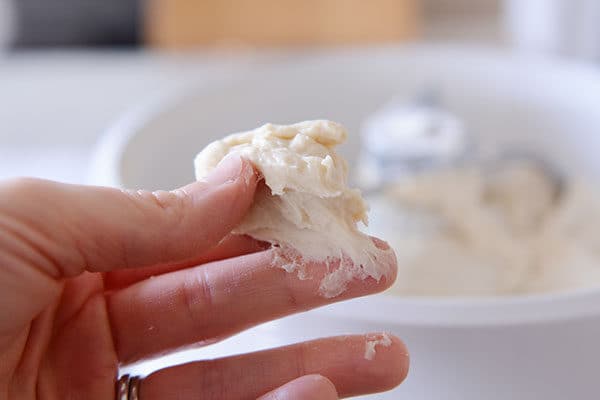
Stop stressing about adding the exact amount of flour called for in a recipe. Many, many factors determine how much flour is needed (elevation, humidity, how we each measure flour, etc.) Add the flour gradually and judge the dough by how it looks and feels. If you need to add a bit more flour, that’s ok!
How to test this French bread roll dough:
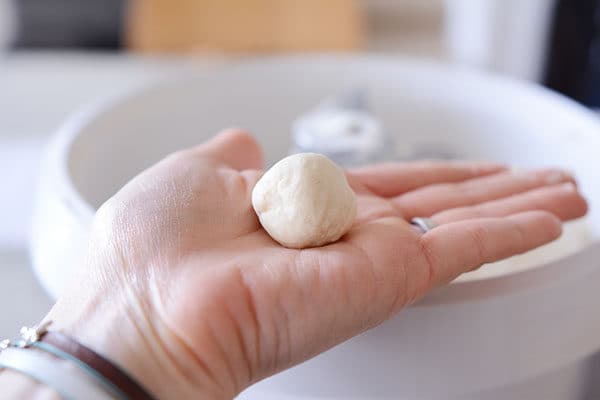
- After the flour has been added and has kneaded for a few minutes, grab a golf ball-size piece of dough.
- Initially, it might leave a little sticky residue on your fingers.
- Try rolling it into a ball without any oil or cooking spray on your hands.
- If it can form a ball shape without sticking to your hands in a shaggy, horror-movie mess, you are good to go. If not, add a bit more flour (a couple tablespoons), mix and try again.
You can see from the pictures below that initially, the dough seems pretty sticky, however, it rolls just fine into a ball without a lot of sticky dough on the palm of my hand. Adding too much flour can lead to rolls that are dense and heavy, so take time to learn what a properly floured dough looks and feels like.
How to Shape French Bread Dinner Rolls
- Cut the dough into 12 equal pieces.
- I like to weigh each piece to make sure they are uniform. Each dough piece usually weighs right around 2.6 to 2.7 ounces.
- Cup your hand around the dough and roll the dough into a smooth ball, keeping the pinky side of your hand against the counter while you roll.
- Pinch the bottom to seal, if needed.
A single batch of roll dough (12 rolls) fits in a 9X13-inch pan. I almost always double this recipe and bake the rolls on a half sheet pan, which fits 24 rolls perfectly.


The Perfect Roll for Sandwiches or Subs
Over the years, these French bread rolls have become more than a dinner roll.
A quick scroll through the comments shows that many of you are using this roll dough for everything from sloppy joes to sub sandwiches.
Make-Ahead and Freezer Notes
Make-Ahead: The dough for these French bread rolls can be made and refrigerated overnight (either in bulk, or the rolls can be shaped, place on a pan, covered and refrigerated). Take the shaped rolls out of the fridge to rise fully before baking.
Freezing: The baked and cooled rolls freeze great. Place the rolls in a ziploc freezer bag, seal the bag, and place in the freezer for up to a month or so.
There is truly not an easier, more perfect roll recipe out there!
I often make these rolls for my holiday dinners – from Thanksgiving to Easter – because they are so easy, they work out every time, and they are always devoured. Plus, they make excellent leftovers!
Tools for Making French Bread Rolls at Home
*Affiliate links included below for products I’ve purchased from Amazon; feel free to shop around for the best price!*
- This is the kitchen scale I use to weigh each piece of dough.
- These containers are great for rising dough (the measurement marks make it easy to keep track of how much the dough has risen).
- Silicone pastry brush for brushing the rolls with butter after baking.
- My go-to OXO bench knife for portioning out the dough.
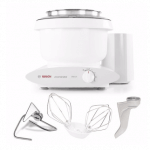
A quick note about mixers: I use a Bosch Universal stand mixer for all my bread making. Here is an older but helpful side-by-side (unsponsored) review I did between a Bosch stand mixer and a KitchenAid stand mixer.
French Bread Rolls
Ingredients
- 1 ½ cups warm water (105 to 110 degrees F)
- 1 tablespoon instant or active dry yeast (see note)
- 2 tablespoons granulated sugar or honey
- 2 tablespoons canola oil, vegetable oil, or olive oil
- 1 teaspoon table salt
- 3 ½ to 4 cups (497 to 569 g) all-purpose or bread flour, more or less (see note)
Instructions
- In the bowl of a stand mixer fitted with the dough hook or in a large bowl by hand, combine the warm water, instant yeast, sugar, oil, salt and 2 cups of the flour.
- Begin mixing, and continue to add remaining flour gradually until the dough has pulled away from the sides of the bowl.
- Knead the dough for 4 to 5 minutes in a stand mixer (7 to 9 minutes by hand). Add additionally flour a tablespoon or two at a time only if the dough starts to cling to the sides of the bowl and is really sticky to the touch (see note below for clarification).
- Place the dough in a lightly greased bowl and cover. Let the dough rise until doubled, 1 to 2 hours.
- Turn the dough out onto a lightly greased countertop.
- Divide the dough into 12 equal pieces (about 2.75 ounces each, more or less), and form the dough into round balls by cupping your hand around the dough and spinning into a round shape, pinching the bottom to seal any rough edges, if needed (video tutorial here right at minute marker 2:20).
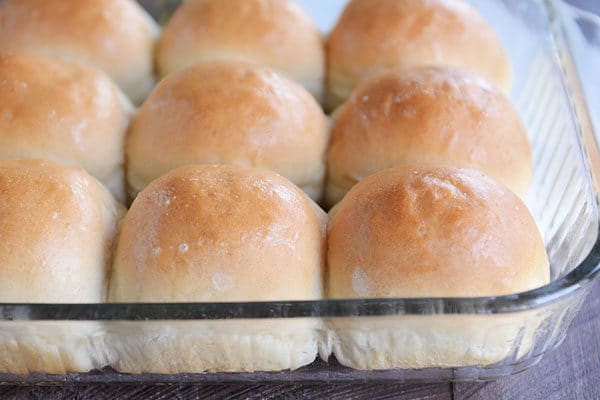
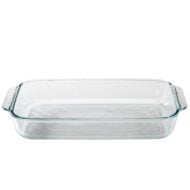
- Place the rolls in a lightly greased 9X13-inch pan or on a lightly greased half sheet pan. Space the rolls about 1/2 to 1-inch apart.
- Cover the rolls loosely with a lightweight towel or greased plastic wrap and let the rolls rise until very puffy and nearly doubled, about 45 minutes to 1 hour.
- While the rolls rise, preheat the oven to 400 degrees F (if your oven bakes hot, preheat to 375 degrees F.) Bake for 17 to 20 minutes until golden and baked through.
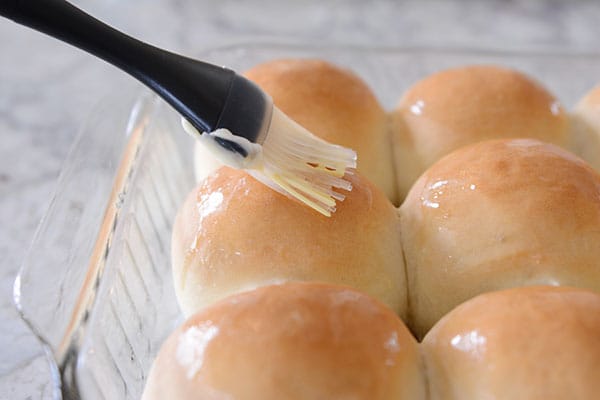
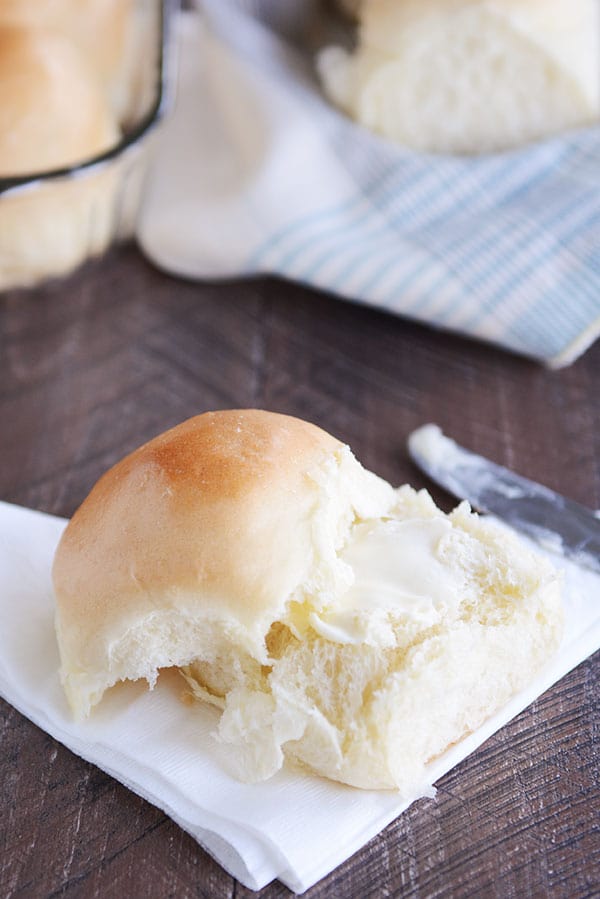
- Immediately out of the oven, brush with butter, if desired. Serve warm or at room temperature.
Notes
Recommended Products
Recipe Source: Mel’s Kitchen Cafe
Recipe originally published 12/2007; updated with new pictures, step-by-step tutorial, and recipe notes.

Hi how big is a us cup in ml? I am in uk. Also are they the same for liquids and dry goods? Thanks
You’ll have to google a conversion, Gill, sorry. I don’t measure in mL and am not familiar with the conversions.
Just made these and they turned out amazing! It was my first time making bread and it looked so daunting, but it was super easy peasy. Ours cooked for 14 minutes and I think they were still a tad undercooked (probably needed a minute or two more), but they still taste amazing, and are light and fluffy. This recipe is a keeper!
I just made these rolls and they turned out flat. I bake a lot of bread but for some reason they did not work. They looked more like biscuits. We have had quite a bit of rain lately could the humidity affect the outcome of these rolls. I had just purchased my yeast and the expiration date isn’t until March 2015. My flour was a bread flour. I am at a loss for what happened. Any ideas?
I think the humidity can definitely play a factor; was the dough overly sticky? If so, it may not have enough structure to rise up (I’ve had them flatten while baking a time or two when I have under floured them).
Have you ever made these with herbs? Trying to find a simple herb roll recipe without milk!
I haven’t tried them with herbs but I think they’d be delicious with fresh rosemary.
Mel! I made these and they are oh so good! After I form the dough into balls, can I freeze them, then thaw and cook them later? I’m thinking for thanksgiving prep. I’m in charge of rolls!
Hi Mel! I just took these rolls out of the oven, and they look fantastic to go along with our old-fashioned goulash tonight. I watched your tutorial for making round rolls and I am just curious. Why do the rolls in your photo look like they were pulled apart from each other? You may have answered this somewhere, but I don’t have time to go through the 250 plus comments. 🙂 Thanks for your blog! It’s my favorite!
Hi Annie – usually when I make these and place them on the pan, they rise and bake with the sides connected so after they have baked, they have to be pulled apart to get a single roll off the pan. It’s probably a matter of how far apart or close you put them on the pan. Hope that helps!
I just took a batch of rolls out of the oven. They look fantastic. Cannot wait to have one. Using it with your “The Best Sloppy Joes” recipe. Dinner will be fantastic.
Would love to see a tutorial on making hoagie/sub rolls with this dough. I’ve done it twice now but I’m never sure the best way to shape the dough and how big each one should be for a nicely sized finished product.
I think THIS tutorial will really help. Good luck!
I tried these using 3/4 white whole wheat and the rest all purpose. They are good but for some reason they taste a bit bitter. Also, they looked pretty just out of the oven but the ones in the middle of the cookie sheet got sort of wrinkled once cooled. What did I do wrong? Help!! I really want to get these right and I know I must have done something.
Patty Moreno – If they are wrinkling quite a bit, you can try baking them a minute or so longer. Mine actually get slightly wrinkly on top and softer than when they first pop out of the oven so that is slightly normal (but super duper wrinkly probably isn’t). Also, if you want crispier crust, you can try baking them in the oven alongside a baking pan filled with water. The steam can help get that crunchy exterior. Have you tried the whole wheat version of these rolls? http://get-fitter.news/fluffy-whole-wheat-dinner-rolls/%3C/a%3E%3C/p%3E
Thank you! Once again you don’t disappoint. I decided to try and make these for hamburger buns.. (I’m a hamburger bun snob and hate store bought nasty ones). I usually just use costco size rhodes rolls to make buns and while they are good they just aren’t quite dense enough.. I have attempted buns from scratch before and they were way too dense.. I was scared but gave these a try anyway.. AMAZING! I couldn’t wait until dinner and tried one dipped in BYU creamery ranch. Soooooo good!
I am excited to try these rolls. Do you think I could use coconut oil in place of the canola oil?? Or olive oil? I prefer not to use canola oil. Thanks!
Holly- Certainly worth a try!
Just made these, they are terrific! I think i may put an egg wash on top before i bake them the next time just so they look shiny on top.
Thanks for such an tasty yet simple recipe!
I’ve made this recipe many times and it always turns out great. For hoagie buns, this recipe will yield eight 4-ounce buns, which I usually use for Italian Beef or Meatball Sub sandwiches. The last time I made these I added 1T dry milk and 2T instant potato flakes, which produced even softer buns. Thanks Mel.
I love your website!! At least one of your recipes is always on my dinner list! I tried making these rolls and while they were delicious, they were really, really soft. Are they supposed to be? I’m not great with breads but I thought I was doing well until the second rise and baking part. They didn’t rise very well the second time and that could have been because they were too spaced out. If the dough was kind of sticking to my fingers when rolling it into balls, does that mean I didn’t have enough flour? And while baking, the tops never toasted, but the bottoms got almost too done! What could have happened?
Hi Kerah – from what you are describing, it does sound as though you need more flour – start by adding 1/4 cup until the dough is slightly less sticky (you might need upwards of a cup or so). The dough should be soft and slightly tacky but not so sticky that it leaves a lot of residue on your fingers. Also, check the position of the oven rack – I’ve found each oven I’ve used (we’ve moved a lot!) differs and my rolls and even cookies brown differently if the oven rack is at the bottom of the oven or in the top third. Right now, my oven cooks most evenly in the top third. Good luck! Let me know if you have any other questions!
I made these rolls last night for dinner …. I must say they were some of the best rolls and easiest I have ever made. The true test for me came tonight ,when I pulled the leftovers out of the freezer and zapped them in the microwave ……….. Oh my gosh !! They were just as yummy tonight as last night !!!!! This is my new go to roll recipe:)
WOW! I have been under the impression for years that I had the BEST roll recipe. My sons-in-law and grand children love it, BUT I think this recipe will win out. I used half the recipe for ham roll ups, and froze the other half as plain rolls and am anxious to see how those plain rolls will bake. The ham roll ups will be made again- for my next stitching group luncheon. My husband gave his stamp of approval, too. And I am looking forward to our next family dinner to try this roll recipe out for the gang.
I chanced upon your website about a month ago and am so glad I did. I have been dealing with a health issue for over a year and have to avoid all preservatives, artificial colors, artificial flavors, etc. (or else I end up in lots of pain!). I love this roll recipe and it is wonderful to be able to eat a hamburger again! I have completely changed the way my family eats (I bake all the time now) and your recipes are amazing. Thank you!!
I made these today for our Easter dinner, and my 3 year old nephew exclaimed “yummy buns” at the dinner table as he was having a bite, which was the best testimonial I could’ve gotten! The recipe is amazing – thanks so much! And your tutorial on rolling the dough was perfect. We’ll for sure be having these again – everyone loved them!
I made these rolls with your Best Sloppy Joes recipe, and they were amazing! I divided the batch into 8 rolls, and they came out a perfect size. I probably should have lowered the temperature and cooked them a little longer, though, because they did come out a tad doughy. Nevertheless, they were a hit!!
*rolls!
Mary
Thanks -Mel a great fool proof recipe I’m going to teach my Grandaughter how to make them God bless you
How do you shape these roles for hoagies?
Jenna – I use about 4 ounces of dough and roll them into a thin-ish log (maybe about 1 1/2-inches thick and 4-inches long). Let rise until super puffy then bake.
I recently made these rolls and they turned out perfectly! So delicious! I also used your tutorial on shaping rolls. Such a great technique! My rolls were so pretty 🙂 Thank you!
I made these last night…..seriously easy…light and fluffy golden goodness! Thanks for recipes that work, taste great and I can make when my baby goes to bed! Love these♥♥
I was wondering, how do your bread rolls get that light brown color? My rolls don’t change color at all, and when I turn my oven on broiler they get too brown an crisp. Do you have a specific oven?
Viktoriya – Try moving the oven rack up or down in your oven – each oven is really different and I’ve noticed in different houses I’ve lived in I have to experiment with moving the oven racks up and down because rolls brown differently based on where they bake.
Wow, just made these nifty little rolls for the first time and they are so fresh and delicious! The smell of fresh bakery style bread is amazing, my husband loved them. Thanks for this great recipe!
I’ve been married for 11 years now. I’ve tried honestly only a handful of times to make rolls because dough intimidates me to no end. And they never turn out. I made this recipe tonight and it is one of the happiest ‘kitchen’ moments of my life! The rolls turned out PERFECT!!!!!!!!!!!!! Thank you for once again providing a spectacular recipe and easy instructions!
Why did my rolls turn out looking like perfect round egg shapes? How did you make yours look like that, did you cut them on the sides before you baked them?
Hi Viktoriya – I don’t cut the sides of the rolls. Here is a video on how I shape them:
http://get-fitter.news/2014/01/video-tip-how-to-shape-dinner-rolls.html%3C/a%3E%3C/p%3E
Have you ever tried this recipe as hoagie rolls? Just shaping them differently? I would think the flavor would be great.
Amanda – yes! I make these as hoagie buns all the time. I use a bit more dough per roll (about 3 ounces) and shape them longer and slightly wider. They are fantastic!
I make these rolls all the time because they are so simple and good. I’ve been requested to make them for volunteers for our church construction build, they are THAT good!! I just started baking a few months ago (completely taught by you, by the way) so I’m in over my head. I’m wondering, can I just multiply this recipe as many times as I need to for the amount of people? I’m not sure if you can just multiply the ingredients by ten and the dough will turn out the same. Any thoughts or tips? Thank you again for the awesome recipe and for making me a from scratch baker! 🙂
Hi Macy – yes! You can definitely increase all the amounts as many times as you increase the recipe (so for a tripled batch, I just triple everything). The only thing you may edit a bit is the yeast…sometimes I find too much yeast, even in a huge batch of dough, is a bit yeasty for my tastes. But I’ve successfully 5X this recipe before with exact recipe amounts and it’s been fantastic. Good luck!
Hi Mel,
I love fresh homemade rolls for sunday dinner but we get home from church at 5:30 PM and there’s no time to let the dough sit for a few hours to rise. Any suggestions on how I can have dough ready to go into the over when we get home? We are away from home for about 4 hours before we get home so I don’t think I can leave the dough out on the counter while we are away. Thanks for your amazing expertise!
Hi Kristyn, occasionally, I have put the rolls directly from the refrigerator into the oven while it is preheating (so the rolls go in the cold oven while it heats up) and then I bake them for the recommended time, sometimes a minute or so less. It’s not a perfect solution but it definitely helps the rolls puff up in a very short amount of time to get ready for baking. Hope it helps if you try it!
I made these today, and they were great!!! I love butter flavor so about 5 minutes before they were ready to come out I spread a little butter them. Definitely a keeper, next time I’ll put honey butter on them. Thank for the recipe:)
Hey Mel–I got stuck working tomorrow, so I’m going to let the slow cooker and your pulled chicken recipe work while I’m AT work. So today I made your rolls to go with them, and for my first bread making foray, not bad. I would definitely double the batch next time, and after I made the dough into rolls, they didn’t rise well for some reason. Still, they taste good and I’m eager to try again. Thanks!
Hi Matt – try adding a bit less flour and see if the rolls rise better next time. Hope you liked the slow cooker chicken!
Made the rolls and had the pulled pork , they were so good @ I can’t wait to try many of your recipe . I shared you site with a friend and right now she is making your pretzel bites . Thank you Mel for the great recipes
Betty
I made these tonight and they turned out great! This recipe is definitely a keeper! The one thing that I have a question on though – for me they turned out huge! I had twelve hamburger-bun-sized rolls (not that I minded, I’m going to use them for sandwiches anyways). Do you think that I should let them rise for less time? Or just divide them into more rolls?
Hi Laura – I think you could try both variations (smaller rolls or less rising time). If you liked the texture of the rolls the way you made them, I’d continue to let them rise the same but just make a few more rolls. Placing them closer together on the baking sheet will also help so they don’t spread out into larger rolls (makes a taller, slightly more dense roll).
Oh my…these were so good! Thank you so much for sharing your favorites. At first I would hoard all my good recipes so no one else would make them…thanks for sharing yours! I love them all and tell my friends about your site! And a mama of 5…you are my kitchen hero! Keep up the hard work 🙂
Mel, these are amazing! I want to try this recipe as hamburger buns, when you do that do you shape them differently, or divide it into less rolls?
Hi Amanda, when I do hamburger buns, I use about 3 ounces of dough per roll instead of 2.25 ounces. It’s about 8 buns/rolls per batch.
These are great, I’ve made them several times. Have you ever frozen the dough after rolling into the balls (before the second rise)? I’m Thinking you could put them out on your counter for several hours after frozen til they double and then bake. Curious if you’ve ever tried and how it worked. Thanks
Katie – I have tried this once or twice but it’s been a long time so I don’t remember the exact details; but yes, this recipe is so forgiving and is perfect for refrigerating or freezing the dough.
Hey Mel,
I’ve made these rolls before and love them, and I have seen that you have made them for buns multiple times. How do you make them into “buns.” Do you do them the same size as a roll and just bake them on a cookie sheet, or bigger? Do you need to press them down at all? Thanks so much! LOVE LOVE LOVE your blog! I have made the majority of my dinners from here for years!
Hi Amanda – yep, I make them for hamburger buns and sandwich buns all the time. I have a kitchen scale and usually measure out about 3 ounces of dough for buns (vs. about 2 to 2 1/2 ounces for dinner rolls). I bake them the same way, maybe adding another minute onto baking time and I don’t put quite as many on a baking sheet. I’ve started pressing them down slightly for hamburger buns but not much. Let me know if you have any other questions!
Hi Mel, I love this recipe and make it a lot. I am going to try to make it this week with 1/2 white whole wheat flour and 1/2 white flour. But I have a lot of bread flour to put to use. Do you think I could use bread flour instead of all-purpose for the white portion or would it change the deliciousness or texture of the rolls? Thanks as always.
Hi Teresa – this recipe is so forgiving. I’ve used bread flour, wheat flour, all-purpose – you name it. I think you could definitely sub bread flour for the all-purpose. The texture of the rolls may be a bit on the chewy side but as long as they aren’t overfloured, they’ll be delicious.
I love this recipe and have been using it for a couple of years-do you think I could use this dough to make scones for Navajo tacos (Aka “fry bread?”)?
I love this recipe and have been using it for a couple of years-do you think I could use this dough to make scones for Navajo tacos (Aka “fry bread?”)?
I’ve never tried that, Jennifer, but I think it would work since this is a pretty basic dough.
Hi! ……. just wondering if these can be made in a bread machine on dough cycle – I don’t see why not but thought I’d check to see if anyone has used their BMs for making them.
Thanks!
Barb – I don’t have a bread machine but as long as the capacity of the dough will fit in the bread machine, it should work ok.
Hi Mel,
I have just found your blog and to say I love it is a gigantic understatement! So first of all, Thanks.
I just made these rolls. I am Australian and I live in Turkey. The bread in Turkey is awesome and super cheap and basically delivered to my door as often as I want. What I am trying to say is, I have absolutely no reason to make these rolls other than the fact I wanted to experiment with bread baking.
They are fantastic and were such fun to make. I was literally sitting on the floor in front of the oven watching them bake!!! I also watched the dough rise the first time…fun!??!
When they came out of the oven, I wanted to wait until they cooled down to have a sandwich…I couldn’t wait and ate one that was still so hot it was difficult to hold. I put butter on it….Oh my goodness…a completely satisfying lunch in itself.
Thanks for all of your recipes, beautiful photography and your helpful and amusing narrative.
I will be looking at your blog during boring meetings at work from now on!!!
You may get a million comments that say this same thing but I will write it anyway: I love your website, your recipes, and especially this roll recipe! I’m glad that it turns out fabulous but also that it makes a small batch! Thank you!
I love these as hamburger buns, but I prefer my bread with some whole wheat flour. Have you ever tried subbing some whole wheat flour for the regular flour? I made these and loved them then made two different whole wheat recipes that were throw in the trash bad! So I am back to your recipe wondering if I dare tweak it a little. 🙂
Hi Kim – Yes! I hardly ever make these with all white flour. I always use at least half white wheat flour and sometimes 100%. They work out great (just knead 5-6 minutes longer to develop that gluten and don’t overflour)!
Thank you very much.it was my first time to make this bread and it came out perfect!!! I love French bread rolls since I was a kid so when I saw your recipe I did not have any second thought to make and the outcome was extremely Amazing!!! Yummylicious!!!! Buenísimo
Not that these need another positive review (because there are SO many), but these are AMAZING! Super easy and so delicious! I think it’s tacky when I like the food I make too much, but I couldn’t help but repeat how good they were 🙂 I’ll make these again and again and again…
I’m going to use this recipe for your cheesy ham and broccoli crescent braid. Will that work? How long should I cook it? In the ham recipe it says 350 for 20mins but in the bbq recipe that uses this bread recipe it says 400 for 15-20mins. Thanks! I love your blog.
Hi Jane – I use the french bread roll dough for braided recipes like the one you are referring to all the time so it should probably work (I haven’t made that cheesy ham and broccoli braid recipe in years). I would use the time/temp in the BBQ braid recipe.
I cannot tell you how many times I make these rolls. Anytime any recipe calls for “bread dough,” or if I ever need buns/rolls for burgers/sandwiches. I use these rolls. Not to mention if I just want some good rolls 🙂 This recipe is truly fabulous and must-have-always-on-hand.
i’ve had success with every recipe i’ve printed off that you posted Mel- but these rolls are amazing! thank you for my new favorite go to roll recipe for everything!
Mel,
Just made these for dinner tonight for our corned beef sandwiches. These rolls were awesome. They were light and fluffy. Thanks for another awesome recipe.