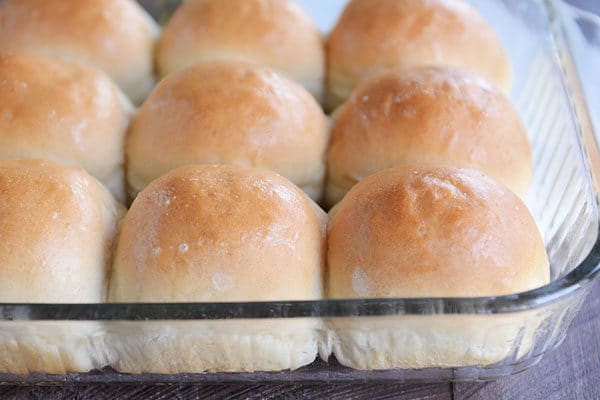
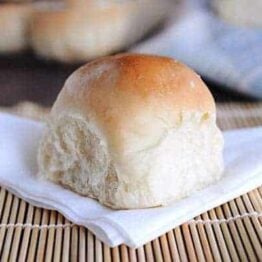
French Bread Rolls {Step-by-Step}
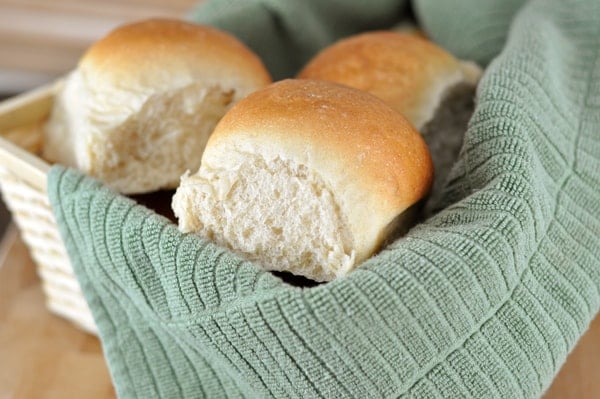
These French bread rolls make the best dinner rolls, hamburger buns, or sub buns. They are light, fluffy, and perfect for beginner (or expert) bakers. With over 1,000 5-star reviews, they are one of the most popular roll recipes on the internet.
⭐️⭐️⭐️⭐️⭐️ Thank you so much for the recipe. The rolls were wonderful. Made a double batch for Easter and froze some. They freeze excellently. Will be my go to rolls. -Jackie

Why So Many People Love This Recipe
The dough for these French bread rolls is straightforward and very forgiving. Here are many reasons why this is a foolproof, trusted recipe:
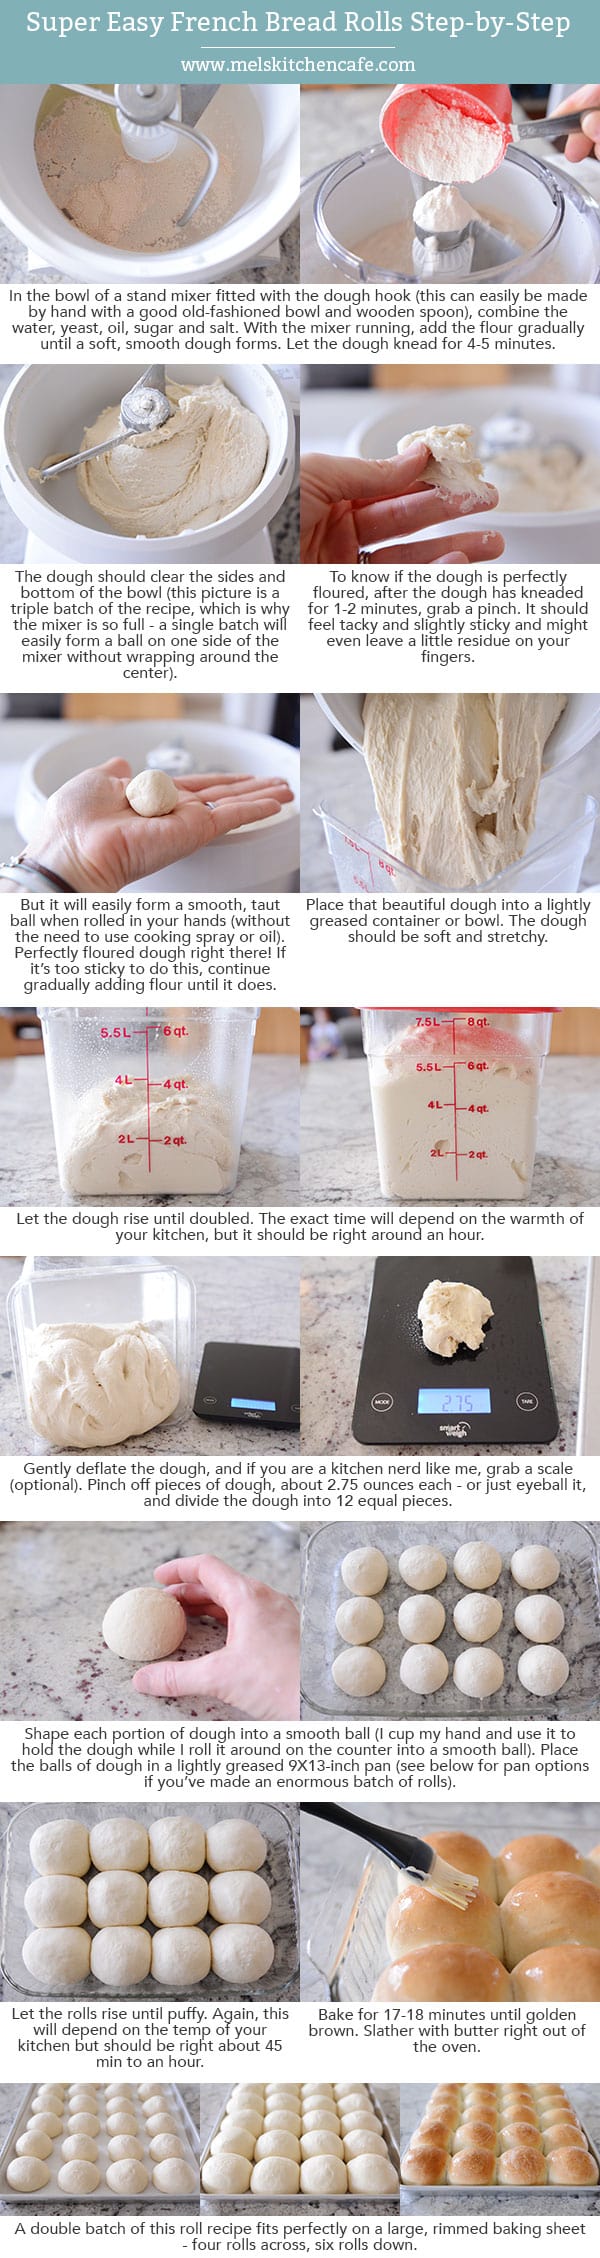
- A stand mixer fitted with the dough hook makes easy work of this recipe, however, the dough is so easy to make that it can also be mixed and kneaded by hand.
- The recipe doesn’t require scalding milk or any fussy steps. The ingredients are basic and dairy-free (other than brushing the tops of the baked rolls with butter).
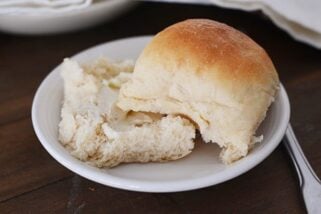
- The rolls are ultra-soft and fluffy.
- You can shape the dough into dinner rolls, sub buns, hamburger buns – and some reviewers even report using the dough for pizza crust.
- These French bread rolls are easy enough for simple dinners and delicious enough to serve at any holiday dinner.
Ingredients Notes
- Warm water: The temperature of the water should be between 105 and 110 degrees F.
- Yeast: Both instant yeast and active dry yeast work in this recipe.
- Sugar: The small amount of sugar in these rolls helps activate the yeast and assists in the rolls rising quickly. It isn’t enough sugar to make the rolls taste overly sweet. You can dial the sugar up or down depending on your taste preferences.
- Oil: A few tablespoons of oil gives the dough a supple, smooth texture and helps the rolls taste fresh even the day after baking.
- Salt: I use table salt for this recipe.
- Flour: All-purpose or bread flour can be used – or a combination of both. Bread flour will create a chewier, fluffier roll texture. You can sub in 50% whole wheat flour for part of the white flour; if doing so, I recommend using a white whole wheat variety, which helps the dough stay light and fluffy.

Tips for Making Yeast Dough at Home
Here is the biggest tip I can give for successfully making yeast dough at home:
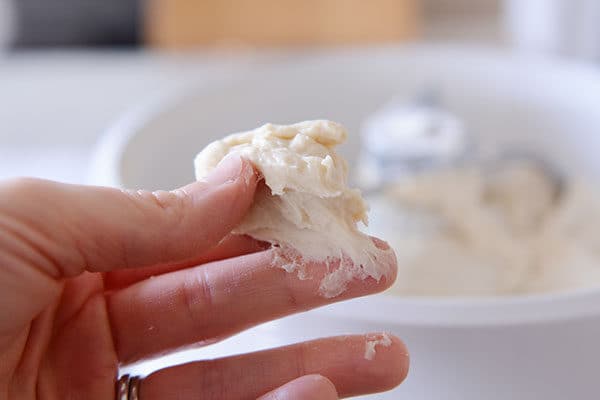
Stop stressing about adding the exact amount of flour called for in a recipe. Many, many factors determine how much flour is needed (elevation, humidity, how we each measure flour, etc.) Add the flour gradually and judge the dough by how it looks and feels. If you need to add a bit more flour, that’s ok!
How to test this French bread roll dough:
- After the flour has been added and has kneaded for a few minutes, grab a golf ball-size piece of dough.
- Initially, it might leave a little sticky residue on your fingers.
- Try rolling it into a ball without any oil or cooking spray on your hands.
- If it can form a ball shape without sticking to your hands in a shaggy, horror-movie mess, you are good to go. If not, add a bit more flour (a couple tablespoons), mix and try again.
You can see from the pictures below that initially, the dough seems pretty sticky, however, it rolls just fine into a ball without a lot of sticky dough on the palm of my hand. Adding too much flour can lead to rolls that are dense and heavy, so take time to learn what a properly floured dough looks and feels like.
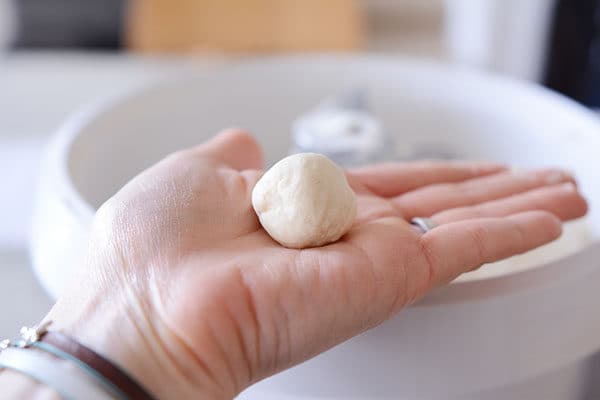
How to Shape French Bread Dinner Rolls
- Cut the dough into 12 equal pieces.
- I like to weigh each piece to make sure they are uniform. Each dough piece usually weighs right around 2.6 to 2.7 ounces.
- Cup your hand around the dough and roll the dough into a smooth ball, keeping the pinky side of your hand against the counter while you roll.
- Pinch the bottom to seal, if needed.
A single batch of roll dough (12 rolls) fits in a 9X13-inch pan. I almost always double this recipe and bake the rolls on a half sheet pan, which fits 24 rolls perfectly.


The Perfect Roll for Sandwiches or Subs
Over the years, these French bread rolls have become more than a dinner roll.
A quick scroll through the comments shows that many of you are using this roll dough for everything from sloppy joes to sub sandwiches.
Make-Ahead and Freezer Notes
Make-Ahead: The dough for these French bread rolls can be made and refrigerated overnight (either in bulk, or the rolls can be shaped, place on a pan, covered and refrigerated). Take the shaped rolls out of the fridge to rise fully before baking.
Freezing: The baked and cooled rolls freeze great. Place the rolls in a ziploc freezer bag, seal the bag, and place in the freezer for up to a month or so.
There is truly not an easier, more perfect roll recipe out there!
I often make these rolls for my holiday dinners – from Thanksgiving to Easter – because they are so easy, they work out every time, and they are always devoured. Plus, they make excellent leftovers!
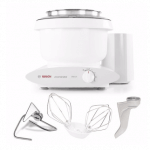
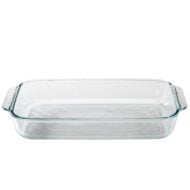
Tools for Making French Bread Rolls at Home
*Affiliate links included below for products I’ve purchased from Amazon; feel free to shop around for the best price!*
- This is the kitchen scale I use to weigh each piece of dough.
- These containers are great for rising dough (the measurement marks make it easy to keep track of how much the dough has risen).
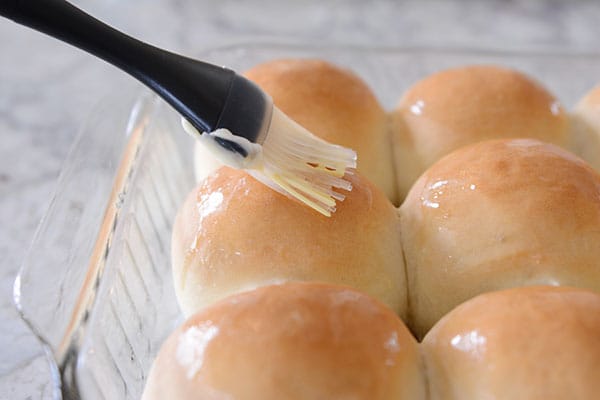
- Silicone pastry brush for brushing the rolls with butter after baking.
- My go-to OXO bench knife for portioning out the dough.
A quick note about mixers: I use a Bosch Universal stand mixer for all my bread making. Here is an older but helpful side-by-side (unsponsored) review I did between a Bosch stand mixer and a KitchenAid stand mixer.
French Bread Rolls
Ingredients
- 1 ½ cups warm water (105 to 110 degrees F)
- 1 tablespoon instant or active dry yeast (see note)
- 2 tablespoons granulated sugar or honey
- 2 tablespoons canola oil, vegetable oil, or olive oil
- 1 teaspoon table salt
- 3 ½ to 4 cups (497 to 569 g) all-purpose or bread flour, more or less (see note)
Instructions
- In the bowl of a stand mixer fitted with the dough hook or in a large bowl by hand, combine the warm water, instant yeast, sugar, oil, salt and 2 cups of the flour.
- Begin mixing, and continue to add remaining flour gradually until the dough has pulled away from the sides of the bowl.
- Knead the dough for 4 to 5 minutes in a stand mixer (7 to 9 minutes by hand). Add additionally flour a tablespoon or two at a time only if the dough starts to cling to the sides of the bowl and is really sticky to the touch (see note below for clarification).
- Place the dough in a lightly greased bowl and cover. Let the dough rise until doubled, 1 to 2 hours.
- Turn the dough out onto a lightly greased countertop.
- Divide the dough into 12 equal pieces (about 2.75 ounces each, more or less), and form the dough into round balls by cupping your hand around the dough and spinning into a round shape, pinching the bottom to seal any rough edges, if needed (video tutorial here right at minute marker 2:20).
- Place the rolls in a lightly greased 9X13-inch pan or on a lightly greased half sheet pan. Space the rolls about 1/2 to 1-inch apart.
- Cover the rolls loosely with a lightweight towel or greased plastic wrap and let the rolls rise until very puffy and nearly doubled, about 45 minutes to 1 hour.
- While the rolls rise, preheat the oven to 400 degrees F (if your oven bakes hot, preheat to 375 degrees F.) Bake for 17 to 20 minutes until golden and baked through.
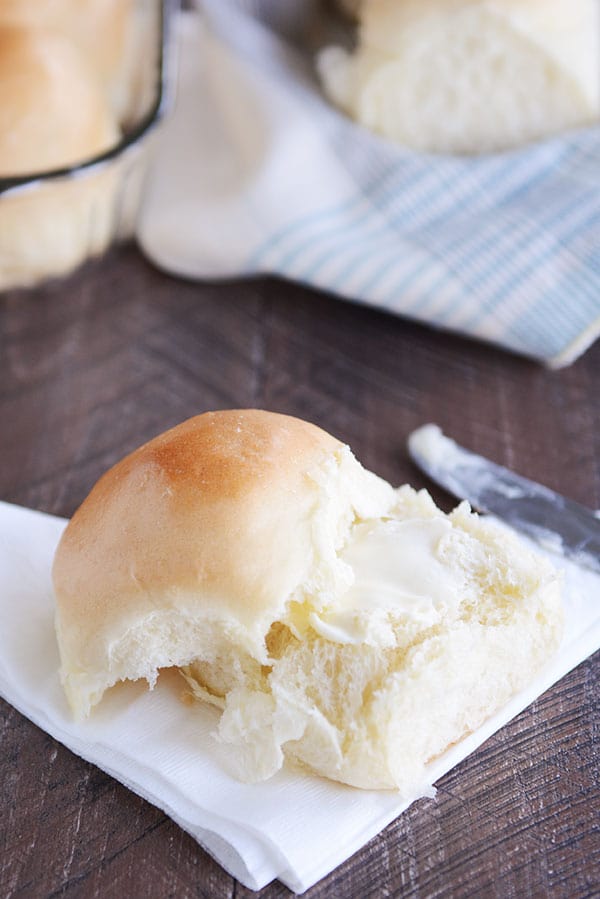
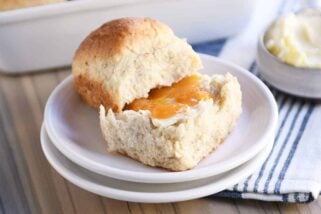
- Immediately out of the oven, brush with butter, if desired. Serve warm or at room temperature.
Notes
Recommended Products
Recipe Source: Mel’s Kitchen Cafe
Recipe originally published 12/2007; updated with new pictures, step-by-step tutorial, and recipe notes.

Hi Mel! Maybe I missed this in comments, but what’s the difference between just active dry yeast and a rapid rise? Can I use rapid rise if that’s all I have? 🙂
Hey Lindsay – rapid rise is usually the same as instant yeast. So you can definitely use rapid rise in this recipe!
Hi Mel – is it possible to do all the prep the day before and bake the next day or will the dough continue to rise too much (or be otherwise affected by leaving it in the fridge overnight)?
Yes, you can totally do that! Just make sure when you take them out of the refrigerator that they have time to rise and double before baking.
I have always been a little intimidated to make rolls! I’m hosting Easter this Sunday and wanted to try to make some! I made these tonight as a test run and they were awesome!!! Super easy and yummy! Thanks for the recipe!!
That makes me so happy – way to go, Traci!
Thanks mel! Husband thought they were store bought 🙂 Also made the dough in the bread machine, took it out and did final rise, then popped in oven. So yummy!!
I’ve been making and loving these for the past (almost) 5 years, when I first came across your blog. They are a family favorite for hamburgers, dinner rolls, cold meat sandwiches, hot meat sandwiches, pretty much everything. And this recipe was actually my first roll recipe that I made, where the finished product actually looked like a legit roll, just like your pictures. So count me in with the hundreds of other people that love this recipe, and love you!
How do you store them when you’re planning to use them in the next couple of days? The only time I made them I let them cool completely and then stored them in a ziploc bag and they sweat and got soggy. I’m thinking I’ll store them in a paper bag next time.
Hi Sarah – I store them in a ziploc bag but haven’t had the same experience with them getting soggy. Darn! You could try storing them in a tupperware-container.
Could these possibly be frozen after rolling?
Probably! I haven’t tried it (I usually bake and then freeze), but I think it stands a good chance of working.
Probably a silly question, but how do you measure 3/4 T of yeast? Eyeball it?
I’ve always wondered the same thing. I tried to google it for an equivalent in teaspoons but have not found it.
It’s 2 1/4 tsp., the same amount that is in the individual envelopes.
I just do a scant tablespoon – basically I just barely underfill the tablespoon and call it good. It doesn’t have to be exact. 🙂
I have made these more times than I can count and I feel like it’s a no fail recipe, even the whole wheat version for this recipe. I love this recipe because it is super basic and I always have the ingredients. Some rolls require eggs, potato flakes, scalded milk, milk powder, sour cream, etc. Because they lack the extras, I guess, they don’t stay super soft or fresh for more than a day, so I usually freeze what we don’t eat right away.
Loved this post because I love these rolls! They are definitely the easiest I’ve made and are super tasty. One question–sometimes the bottoms of the rolls turn soggy, and it doesn’t seem to matter if I spray the pan or use a silicone mat. Do they need more time, or perhaps to come out of the pan sooner?
Are they lightly brown on the bottom? If not, I’d move your oven rack down one position (but not if that means it’s sitting in the lowest position, if that makes sense), and yes, definitely pop them out of the pan onto a cooling rack if you want to minimize the soggy factor. That happens to me all the time.
I love these! I made a batch Sunday and froze them. I pull a couple out every night to defrost for lunch the next day.
I have made these rolls more times than I can count! People ALWAYS love them and they make me look and feel like a total rock star! They will definitely be gracing our Easter table this Sunday!
We just made this dough as a part of your philly cheese steak recipe and my husband couldn’t stop raving about how easy the dough was to work with and how well it cooked up.
I’ll have to try these!
It just amazes me how some recipes are named after a country… where no one actually eats the said dish! I live in France, and no one eats dinner rolls 😉 Bread over here is plain flour/yeast/salt/water, and there has to be a crispy crust!
(it’s just like French fries, while we do eat them, it’s actually a Belgian specialty!)
These are THE BEST!!! My family Loves them. I make them for thanksgiving dinner and lots of things imbetween! Love them!! Just had to say
These look amazing!
Paige
http://thehappyflammily.com
These are my go-tos as well! I usually do 2 oz for dinner rolls and 3 oz (flattened after I roll them into a ball) for buns. Thank you for the recipe!
These are the best rolls ever! We make them all the time and it is the only roll my family asks for! I make triple batches and freeze them.
Thanks Mel for sharing the best recipes!
This is my favorite recipe for hamburger buns (there’s an incredibly useful video by Mel on shaping these rolls which includes hamburger/hotdog bun weight measurements). If anyone else has a 6-cup hamburger bun pan like me, you’ll find that 2/3 of the recipe makes exactly 6 hamburger buns (the measurements for this recipe divides into thirds easily!) BTW, a bun pan is NOT necessary for the hamburger buns, but once I used it I couldn’t go back to my oddly shaped buns.:)
This recipe has become a standby at my house over the last several years! It is still a favorite! So yummy, easy, and successful every time!!
I made these rolls tonight for dinner along with the chicken!!! Delicious! I make tons of recipes from here, in fact we just finished the carrot cake! I love your sight so much, it is very helpful, organized, and doable!! Thanks so much!
Thank you!
Mel, excuse my ignorance, is it possible to share your recipes on Face Book ? I have looked high & low but can’t find any shares. Thank you
Hi Nora – at the top of the post underneath the title, there are some sharing icons. The one on the far left is for Facebook. Let me know if you have other questions!
Hi Mel,
I made the rolls into buns to have with your Italian meatball sub recipe. I followed the recipe and used my bread machine on the dough setting for the first rise. The dough was easy to work with and the subs were delicious.
Thanks
I made these rolls and they were delicious! I had one small problem in that they did not brown on top but stayed quite pale. I tried cooking them longer but was afraid the bottoms would burn (as the bottoms were perfectly golden). They tasted wonderful and my family ate them up but would love to have them golden on the top like the photo. Any tips on what I could do next time?
That’s a great question and I know others have had the same issue. I’ve found a couple factors – baking them at 25 degrees higher oven temperature can help as well as moving the oven rack to a different position. For some reason in my oven, they brown better in the upper third of the oven but others have commented saying their rolls didn’t brown until they moved them to the bottom third. Do you have a gas or electric oven?
I have made several of your bread/roll recipes and these are my new favorites! I used bread flour and always use SAF brand yeast that I store in the freezer, so I have found that I don’t need to proof it first. They came out so light and fluffy…they almost melted in our mouths. I love that they came together so quickly too. Thank you!
help!!! I made these rolls for thanksgiving (tomorrow!). i believe they will turn out well, but i could not get the flour to turn out right. the first batch i just shaped into bread because it was way too sticky to do rolls. i made another batch and tried to get it more tacky and less sticky. it seemed to be ok, but after rising it was really sticky again. i did the test like you said in your tutorial (pick a bit up and it may be sticky but once you roll it out it should dry up. it seemed to dry up enough). when it came time to roll my hands were COVERED and it was so tedious with the extra stickiness on my hands. i was so worried about not over flouring. i should note…i used 100% all purpose and i usually work with whole wheat. my mom thought everyone would like this better. but, i’m not used to working with white flour. so maybe i just don’t know what to look for. any tips?? thanks! 🙂
Hi Amanda – it definitely sounds like you need more flour (probably upwards of a cup extra flour if it was that sticky rolling them out). It shouldn’t be significantly different texture-wise using whole wheat vs white flour…but from how you describe it, that stickiness is a bit overly sticky. Try adding more flour. I bet that will do the trick!
My buns did not brown?
It’s a good thing I don’t have to tell you in person how incredibly amazing these rolls are–as my mouth is really busy right now (with roll No. 2). I have been making bread machine rolls and French loaves for years, but today I ventured into the world of manual dough making via your recipe. And I’m over the moon with the results! Thanks for another rock star concoction.
Have you used this recipe for sandwich bread in a loaf pan?
No, but I bet it would work great.
I’ve made it into sandwich bread and it works great!! It only keeps for a day or two, but I have to hide it to make it last that long
Is it necessary to cover with plastic wrap or can we bake it uncovered?
Definitely bake the rolls uncovered, take off the plastic wrap before baking.
I’ve tried out a lot of your recipes (mostly the dessert ones) but this has to be one of my favourites! This was my first time actually making bread and they turned out lovely. I’ll definitely try to venture out of the dessert world a bit more now 🙂
I love your blog! I’ve made this recipe a few times and every time they turn out flat. They expand out rather than up. I’ve tried adding more flour and being very careful to not squish the rolls when they are rising the second time. Any tips?
Hi Jenny – hmm, you’re pretty certain the dough has enough flour? That’s the main reason I’ve seen these rolls want to spread out instead of up. Also, how close are you spacing them on the baking sheet? Another thing to keep an eye on is making sure the ball you roll them into is very, very tight – it shouldn’t be squishy at all, it should be very firm and taut when they are rolled and then of course the get nice and light and squishy as they rise.
These were so lovely and simple! My three year old even helped roll the dough into balls. The dough was so easy to work with. We had French dip sandwiches on them and they were perfect.
perfect and delicious! My 5 yr old daughter watched the shaping tutorial with me, and she helped me make the buns.
I just made these rolls, and the top got golden brown but the center and the bottom was doughy, do you know what I did wrong? My dough was a little sticky, so maybe I need to add more flour or do you think I should lower the rack in the oven. This happened to me when I made your homemade pizza dough also. Maybe I’m not meant to make breads. Ha ha!!
You might try decreasing the oven temp just a bit so they cook more evenly before the tops get too brown.
So I tried to make these rolls and the tops got done, but the center and bottom was doughy. Do you know what I’m doing wrong?
I’ve lost count of how many times I made these beauties. They are so easy to work with and produce such a great flavor. I love the tip on getting them perfectly round. This recipe is also the reason I bought a scale and can’t remember how I ever lived without it! I store them in the freezer and pop them in the microwave when we’re ready to eat them. Delicious!
I just made this. A Sub roll version, I got four 10 inch rolls. I needed to use 5 cups of flour before it would stop being overly sticky…was still rather sticky. but I was able to continue with a greased bowl and well greased countertop. Thanks for the recipe!
I think that there should be a note somewhere that these come out hard shelled, but soften as they cool. Or is this common knowledge among breadmakers?
Thanks again! I can’t wait to try your monkey bread.
I don’t normally comment on blogs but I needed to after making these rolls. OMG, these were so good, my guests thought these were store bought! I have tried numerous roll recipes and they’ve all tasted overly yeasty – not these ones. These were amazing! Soft, fluffy and delicious! I may have to make more today and freeze them. Thank you for my new go-to roll recipe!
Yum! I am deciding between making these and your regular French bread recipe. Which would you suggest? What is the taste and texture difference between the two recipes? Obviously besides that these are rolls and the other recipe is a loaf…
I think either are great – they are fairly similar in taste and texture. Maybe start with the bread and see what you think. 🙂
Hi Mel!
Since I discovered your blog, I’ve gotten excited about cooking again and itching to try new things. I just made these rolls. They flopped a bit because I didn’t factor in humidity (and then my 2 year old daughter flattened more than half of them right before I put them in the oven). They still tasted great (and looked almost great 😉 ).
Question though: on your tutorial, you said 2.5 oz of dough for a dinner roll, 3 for hamburger buns, and 2 for hotdog buns. What would you suggest for sliders or child size dinner rolls?
(PS my 4 year old son gobbled up 2 sloppy joes made with these buns after throwing a tantrum that he didn’t like any of the ingredients I put into the sloppy joes! I was flabbergasted. If my pickiest eater loved these, they’re a winner in my book 🙂 )
Hi Chava – I’d probably suggest about 1.5 oz for slider rolls. Glad these were a hit!
I just made these and they are so good. Super soft and fluffy. I was a bit of an idiot and I forgot to knead the dough, but they still worked well. Thank you for another great recipe! 🙂
I just made these again and realized this recipe is the one that brought me to your blog long, long ago. Aah….that was a great day! Should one be sentimental about food?
Thanks for all the recipes you’ve shared ever since!
New to your site! Your bread recipes are awesome! I use whole wheat, olive oil or coconut oil over canola and everything turns out great. I’vehad better success with your recipes and techniques. All way better then I imagined! So excited 🙂
Looking forward to trying many more. Making the roasted potatoes today.
Hi Mel,
If you are doubling or tripling a bread recipe like this, do you need to also double or triple the kneading time?
Thank you for your recipes….I just love every single one, and am slowly getting more comfortable with baking my own bread! You are awesome!!
Hey Ashley – that’s a good question but no, you don’t knead to double or tripe the kneading time. If I’ve doubled a recipe I might add just a minute onto the kneading time but only if my mixer is really full of dough.
I made these for dinner tonight and they were perfectly delicious. My son immediately called dibs on a roll for his school lunch tomorrow:) Thank-you for sharing your recipe, I look forward to trying other recipes from your site!
Mel I just had to tell you, I made these for pulled pork sandwiches for Easter yesterday, and the rolls were great but what killed me was I watched your video tutorial on how to make them and I realized it was the first time I had ever heard your voice. Here I was, a faithful follower for six years now and I had never watched a video, ha ha! Thanks for another great recipe, it had never occurred to me to weigh my dough before either. Now I am hooked 😉
Haha! You are too cute, Kristi! I always enjoy seeing your comments pop up (you’ve been a loyal follower for a long time!) and I’m happy that you loved these rolls.
I made these for supper tonight to go with the one pot creamy tuna and shells. They turned out really good and they were super easy to make! They are so soft ! I think I found my go to dinner roll recipe. Thank You so much Mel for all your work you put into your recipes. This is the first place I go to find a meal when i don’t know were to start. Thanks !
After much experimenting and failure with various no knead recipes, I made this one this afternoon … YOWZA – just what I wanted for sandwich rolls, hamburger/hot dog buns. Wonderful taste and texture. I used about 1/2 cup whole wheat and the rest white AP (Wheat Montana hard flours) …don’t know exactly how much. I’m comfortable with kneading, etc. so stopped when I thought all was good.
And really, there is not very much hands on time and I used my hands, no mixer. I am SO happy. Thanks so much Mel for all of the details and recipes and tutorials.
Sometimes I call my neighbor to see if they need anything when I run to the store as we are rural. He often asks me to pick up a package of the Kings Hawaiian rolls. Well, I am going to make them a batch of these this weekend and see what they think!
Yuuuuuuum! I made these last night, and they were incredible. I ended up using slightly less than 3.5 cups flour only; I’m guessing because my flour is from a bag and not “homemade”, so it’s more compacted. Anyways, I made them into hamburger buns and buttered and grilled them as you suggested. That was insanely good. My “I could eat cow for every meal of the day” husband almost preferred the bun to the burger! (I used your grilled burger recipe too, it was good). In conclusion, I have loved making your yeast recipes so much that I went out and scored a used Bosch on ebay yesterday for $200. The Kitchenaid just wasn’t cutting it. Thanks Mel!
Melanie! I’m doing {really bad} cartwheels about your new Bosch. Yay!
Thank you for the recipe! These rolls were so easy to make which is very important to a baking novice like me! They looked amazing coming out of the oven and their appearance and texture were right-on. However, the taste was completely bland, which the family also pointed out :(. I don’t understand what went wrong and why they had no flavor whatsoever. I used the exact quantities and steps listed in the recipe.
These rolls are such a hit with my family! Thanks for the recipe Mel! I’ve even got my dad making them since they’re so simple and yet so delicious! He likes to mix it up sometimes and uses 2 cups of white flour and 2 cups of wholewheat flour for a chewier roll.